
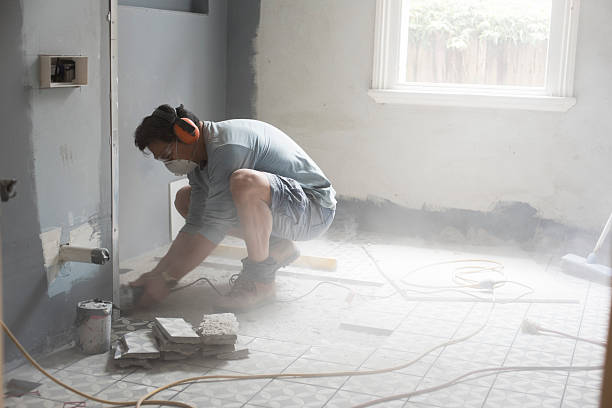
Replacing old tiles sounds like one of the simpler parts of renovating. You break up the existing tiles, clear away the rubble, and get ready for a fresh floor or wall finish. Easy enough, right?
Unfortunately, tile removal has a habit of revealing problems nobody expected. Stubborn adhesive, damaged concrete, hidden waterproofing issues, and dust that somehow reaches the other end of the house can quickly turn a straightforward job into a headache.
If you’re planning to renovate a Sydney home, knowing what happens during tile removal can save you money, prevent unnecessary damage, and help keep your project on schedule.
Why Tile Removal Is Harder Than It Looks
Tiles are designed to stay firmly attached to their surfaces for years. That’s wonderful when you’re living with them, but considerably less convenient when you want them gone.
Depending on the age of your property and how the tiles were installed, they might be fixed with cement-based adhesive, mortar, or another bonding material. Some tiles lift relatively easily. Others refuse to budge without considerable effort.
The surface underneath also makes a difference.
Removing tiles from a concrete slab is different from working on timber flooring or plasterboard walls. Each surface has its own risks, particularly when the goal is to preserve the material underneath.
A careless removal job can leave deep gouges, cracked surfaces, or damaged fixtures. Suddenly, your renovation budget needs to cover repairs you hadn’t planned.
The Hidden Problems Beneath Old Tiles
One of the biggest surprises during tile removal is discovering what’s underneath.
Uneven Concrete and Old Adhesive
Once the tiles come off, you’re often left with ridges of adhesive or patches of mortar.
These remnants can interfere with the installation of your new flooring. Even small differences in surface height may cause problems, especially when installing large-format tiles or flooring products that require a particularly flat base.
Simply removing the visible tiles doesn’t always leave the surface ready for the next trade.
Damaged Waterproofing
Bathrooms, laundries, and other wet areas deserve extra attention.
Removing tiles can disturb or destroy the waterproofing membrane beneath them. That membrane helps prevent water from reaching areas where it could damage the building.
If you’re renovating a bathroom, assume the waterproofing will need professional assessment and, in many cases, replacement as part of the renovation.
Trying to preserve an old membrane during demolition isn’t always practical or appropriate.
Unexpected Substrate Damage
Older homes sometimes contain deteriorated screed, loose render, or damaged wall linings hidden behind seemingly sound tiles.
You might not know these problems exist until removal begins.
Allowing some flexibility in your renovation budget helps avoid the frustration of discovering that the surface needs additional preparation before new finishes can be installed.
Why Dust Control Deserves Serious Attention
Anyone who’s removed tiles without proper precautions knows how quickly dust becomes a problem.
Breaking tiles and grinding adhesive can release fine particles into the air. Depending on the materials being disturbed, this dust may include respirable crystalline silica, which presents serious health risks when inhaled.
That’s why dust management should be part of the removal plan from the beginning.
Professional removal work may involve suitable extraction equipment, dust isolation, controlled methods, and appropriate respiratory protection.
In occupied homes, protecting nearby rooms is particularly important.
Imagine renovating your kitchen while the family continues using the rest of the house. Without suitable containment, dust can settle on furniture, appliances, and belongings well beyond the work area.
For larger projects or difficult surfaces, arranging tile removal experts in Sydney can help ensure the job is planned around the existing materials, site conditions, and necessary safety precautions.
The aim is to remove the unwanted finishes while keeping the surrounding property and occupants protected.
Should You Remove Tiles Yourself?
There’s no denying that DIY removal can look appealing, especially when you’re trying to control renovation costs.
For a small, accessible area with suitable materials and no hazardous substances, it may be manageable with the right preparation and equipment.
However, several circumstances make professional assistance a sensible choice.
Large tiled areas involve significant physical work. Wall tiles can be difficult to remove without damaging the underlying lining. Bathrooms introduce plumbing and waterproofing considerations, while older buildings may contain materials that require special assessment.
Before disturbing flooring or adhesive in an older property, it’s also important to consider possible asbestos-containing materials.
The cost comparison should include more than the price of hiring someone. Equipment, protective measures, waste disposal, surface repairs, and your own time all matter.
A weekend DIY project stops looking economical if the following week is spent repairing avoidable damage.
What Should Happen Before Removal Begins?
A well-organised tile removal project starts with an assessment rather than a demolition hammer.
The contractor should understand which tiles need removing, what lies beneath them, and which surrounding features must remain untouched.
It’s also worth clarifying the boundaries of the work.
For example, does the quoted price include removing adhesive? Will the contractor take away broken tiles? Is surface grinding included, or will another trade handle that?
These details can make a substantial difference to your final costs.
Protecting the Rest of the Property
Before work starts, nearby fixtures and surfaces should be assessed and protected as appropriate.
Kitchen cabinets, door frames, plumbing fittings, and adjoining flooring can all be vulnerable during demolition.
In apartment buildings, access arrangements, lift protection, noise restrictions, and strata requirements may also affect how the work is scheduled.
Sorting out these details beforehand avoids disputes and unnecessary interruptions once the job is underway.
Planning for Waste Removal
Broken tiles are surprisingly heavy.
A modest floor area can produce a considerable amount of rubble, especially when thick mortar bedding is involved.
Waste needs to be collected, transported, and disposed of appropriately. It’s worth confirming whether this is included in the removal service rather than discovering a pile of debris waiting for you afterwards.
How Long Does Tile Removal Usually Take?
There’s no reliable one-size-fits-all answer.
A small kitchen splashback might be removed relatively quickly, while a large tiled floor with stubborn adhesive could require considerably more work.
The size of the area is only one factor. Tile thickness, bonding strength, access, substrate condition, and the amount of preparation required all affect the timeline.
Noise restrictions in apartments and the need to protect occupied spaces can extend the schedule.
Ask your contractor for a realistic estimate based on an inspection or detailed description of the property.
It’s also sensible to leave some breathing room between removal and the arrival of your next trade.
Booking your tiler immediately after demolition, without allowing for unexpected substrate repairs, can create scheduling problems.
Getting the Surface Ready for New Flooring
Removing the old tiles is only part of the job.
Before installing new finishes, the underlying surface needs to be suitable for the proposed flooring system.
That may involve removing adhesive residue, repairing damaged sections, checking surface levels, or preparing the substrate according to the new product’s installation requirements.
For wet areas, waterproofing and associated preparation must be completed correctly before new tiles are installed.
Don’t assume a floor is ready simply because the old tiles are gone.
Ask the installer what condition they expect the substrate to be in when they arrive. That conversation can prevent confusion between the demolition contractor and the flooring team.
A Better Start to Your Renovation
Tile removal rarely gets much attention when homeowners imagine their finished renovation. Everyone wants to discuss colours, layouts, and beautiful new surfaces. Very few people get excited about removing old adhesive.
Yet the quality of the preparation can affect everything that follows.
Taking time to assess the existing tiles, manage dust, protect surrounding areas, and clarify the scope of work makes the renovation easier to manage.
Before choosing a removal method, consider the condition of your property and what your new flooring will require. A properly prepared surface gives the next stage of your renovation a much better chance of going smoothly.
Read more: Building a Custom Home in Brisbane: What to Plan Before You Start
https://similesbook.com/a-new-way-to-create-with-digital-technology-using-an-ai-image-generator/
https://similesbook.com/what-responsible-slot-jackpot-hunting-actually-looks-like/




2 thoughts on “Removing Old Tiles? What Sydney Homeowners Often Overlook”